---
title: "FFXIV - Actually Making Gil Without Crafting"
description: "An actually OK guide at how to become a gillionaire without crafting (not just running roulettes and maps)"
pubDate: "2024-08-23"
---
import '../../styles/ffxiv-gil-making.css'
import FFXIVWorldSelector from '../../components/FFXIVWorldSelector';
import FFXIVItemPrice from '../../components/FFXIVItemPrice';
I've seen a lot of these "making gil without crafting" or "making gil with combat job" guides during my time with the game.
A lot of these videos and guides are fine, but in my opinion they neglect a lot of the late game and niche options that are available to players.
This post will attempt to be a somewhat comprehensive guide/info sheet to making gil without having to level any crafting jobs (cause I get it, crafting is not for everyone).
Keep in mind though that crafters are probably one of the most consistent methods of getting gil. There will be a lot more "instability + RNG" with these methods.
I'll try and order these methods from my least to most favorite methods and leave a bit of a quick conclusion at the end.
---
# Blue Mage Vault Runs
This method essentially involves running The Vault
level synced as a Blue Mage for raw gil (gil doesn't dropped running unsynced).
Since each trash enemy before the first boss drops around 300 gil each and are very tightly packed together, you can burn them down fairly quickly using BLU.
Essentially you'll clear all the trash up until the first boss, then leave the duty and requeue. Each run will take around **3 minutes**
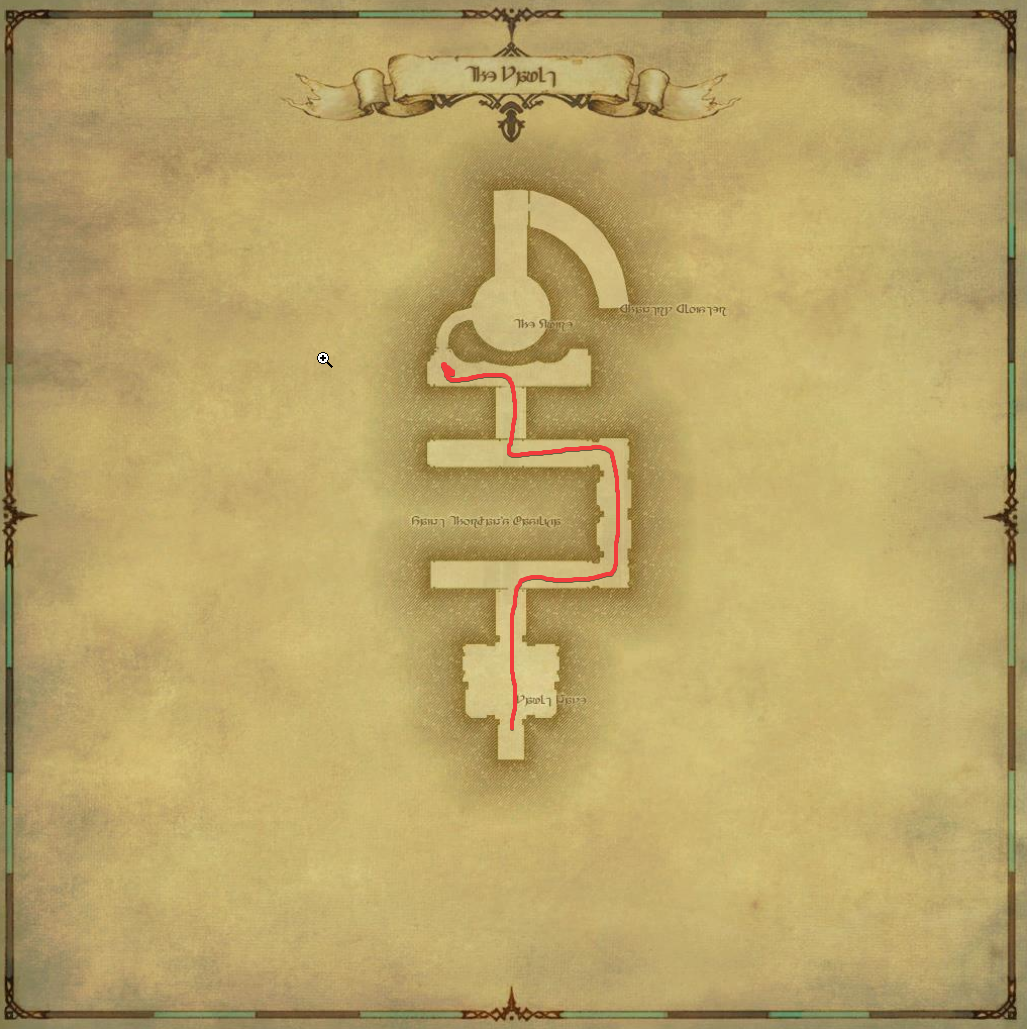
Map of Route to Take in The Vault Dungeon
You can expect to make around 5.5k to 6k gil per run. As there are 19 enemies per run.
This is a consistent method since its farming raw gil, but requires a levelled Blue Mage with some pre-requisite spells.
I'd recommend looking up a video guide on how to do this since there is a bit of technique involved in how to minimize the time
per run and what spells to bring.
- **Overall:** Its not the most terrible thing since to earn 100K an hour, but it'll be an excrusiatingly boring hour of pure grind.
Not bad if you need like 10-20K gil in a pinch though.
---
# Regular Instanced Dungeons
Lodestone Image of Saint Mocianne's Arboretum (Hard)
In terms of regular dungeons, there isn't much that's worth farming. The only thing worth mentioning at all is farming for certain dungeon exclusive housing items.
However, not all of them are worth farming since the drop rates between them vary. This means that there's really only a select few that still hold up on the marketboard.
To find these you'll have to go down the [list of housing items](https://ffxiv.consolegameswiki.com/wiki/Housing_Items), see which ones are dungeon exclusive, and then check the marketboard
If a recent dungeon has been released, try looking at the drop table to see if a housing item is available as well.
Two items that I find are still fairly decent are the Verdant Partition from
Saint Mocianne's Arboretum (Hard)
and Alzadaal's Garden Lamp from Alzadaal's Legacy
| A fair amount of gil if you can sell them | But drops are not guaranteed each run |
|----------|----------|
| | |
- **Overall:** The drops are worth gil but rates aren't great. Options are also limited and sales don't happen very fast. A little more worth it
if you also turn in the dungeon gear for Grand Company Seals.but still not the best option.
---
## Deep Dungeons
Image of Heaven on High
Deep Dungeons are also a bit of a mixed bag. You can certainly make money by doing them but the speed is not very fast (especially if you're farming solo).
All 3 of the currently available dungeons have some sort of exclusive glamour, minions, barding, mounts, etc. that you can get.
Keep in mind to farm the higher floors (100+ for palace of the dead and 30+ for Heaven on High or Eureka Orthos), you'll need to enter as a
pre-made party. You could theoretically go in solo but you'll likely die unless you've taken the time to farm out your Deep Dungeon gear.
If you do have a party, then I'd say that you should just go in for fun and try to reach the highest floor. Explore all the rooms and reap the rewards
along the way
If you're solo farming, then its best in my opinion to just repeatedly farm floors 1-10 of each dungeon. You can get these done even without
queueing for a party and the rewards are still decent.
In that case you'll be looking for some variant of the Bronze-trimmed Sack from whichever
deep dungeon you decide to take on. For example even the oldest deep dungeon, Palace of the Dead's bronze sacks still have high valued gear:
**Beware though! This is a case of double RNG. You'll need to first pray for the sack to drop and then pray you don't get a terrible item from that sack**
- **Overall:** Because of the low drop sack rates, and the fact that you'll need to grind out your Deep Dungeon gear a bit to make this faster;
I tend to avoid this method. I find the rate of finding the sacks themselves too low to be worth it.
---
### Criterion
This is a bit of an add-on to variant dungeons. For those who've never seen it, it basically takes the bosses from all routes of the dungeon and mashes them together
into what you'd exepct from a traditional instanced dungeon.
You'll also have to go in as a standard light party (2 DPS, 1 Tank, 1 Healer). Enemies hit harder and the bosses have more difficult mechanics. Because of this
players on North America use the Party Finder to find groups to run this content.
You'll earn 4 of whatever currency the criterion dungeon uses which can be used to exchange for various items again.
You'll really only have 2 options here since the materia is already outclasses by the 7.0 ones. So its either the mount for 100 (you can get it as a rare drop too!)
or the orchestrion roll for 8.
Both will be worth a fair amount of gil on the marketboard with the orchstrion roll being `2-3 million` and the mount being `10+ million`

> WARNING! If you clear and unlock the Savage variant, you do not get same the currency for clearing Savage!
>
> You get some other currency that is used to exchange for a few untradeable furnishings or accessories. NOT WORTH in my opinion.
- **Overall:** To be honest, this will be difficult to find a group to do solo since past criterions are generally dead content on the party finder.
It also takes a bit of time to learn the mechanics, but if you do get a group and run it every now and then its very decent gil even for just the orchestrion roll.
---
# Grand Company Seals
You can rack up Grand Company seals (or GC Seals) fairly quickly by completing "Expert Deliveries". This is where you can
cash in on useless old gear or dungeon drops. You can usually get around `2000` seals per piece of "high level dungeon" gear.
Then you can spend these seals on certain items that are needed for crafting. In my opinion, most of these items net fairly low gil
but some commonly exchanged items are...
- Glamour Prism
- Coke
- Potash
- Cordial
|As an example of how much these materials go for... | Not very much at all but there's always a market for it |
|----------|----------|
| | |
You can also try your luck by exchaning `20 000` seals for either a 3.0 or 4.0 `Materiel Coffer`. These drop random minions and
mounts from that particular expansion.
Don't get your hopes up so quick though. A very vast majority of the minions are basically worthless on the marketboard.
The actual rare mounts and minions have some serious Japanese gacha game drop rates...
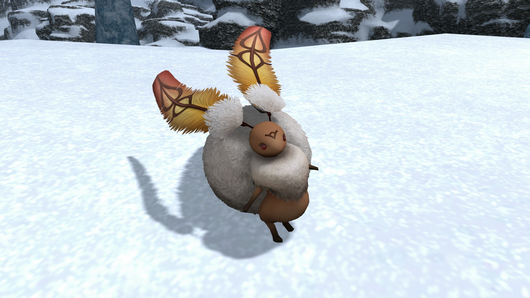
Let's take the Night Pegasus Whistle as an example:
> Based on the drop rate collected by the FFXIV Dalamud Plugin [Tracky](https://github.com/Infiziert90/TrackyTrack).
> ### [This item has a drop rate of roughly 0.03%](https://docs.google.com/spreadsheets/d/1VfncSL5gf9E7ehgND5nZgguUyUAmZiAMbQllLKcoxTQ/edit?gid=1530436115#gid=1530436115)
The same story is true for all of the other rare mounts/minions. If you were to test your luck though I'd go for the 4.0 coffers since it beats
the 3.0 coffers in number of rare items which will give you a slight statistical edge.
- **Overall:** Slow gil but very easy, and a great way to get some value out of old gear.
Don't bother specifically farming dungeons specifically for gear to turn in since the gil comes very slow
---
## Variant Dungeons

Image of Mount Rokkon
A relatively new method introduced in Endwalker so you'll need to be level 90, completed the main story, and unlocked Variant dungeons. These are perfect for farming
since they are meant to be completed with 1-4 players of any role.
Each variant dungeon has a set of exclusive glamours that you can exchange with currency earned from that dungeon.
Using Mount Rokkon as an example, each run is around 25 minutes solo (assuming you don't die) and will net you around 3 Rokkon Potsherds
| Exchange for 18 Shards | Exchange for 9 Shards |
|----------|----------|
| | |
> TIP: If you decide to run this and have all routes already completed, I'd recommend always taking the path that the NPC picks for you at the start
of the duty.
>
>This will give you 1 extra chest that drops some exclusive minions/furniture/items **(no additional currency)**. The items you get from these do
vary though, some are worth a lot and some are worth next to nothing.
- **Overall:** Excellent method to farm a ton of gil if you're willing to put in the time. Pick up the pace and bring a few friends and you can
make quite a bit in a fair amount of time. So long as the glamours are still worth something on the marketboard of course.
---
# Eureka
The methods below all involve Eureka. If you're still new to Eureka then I'd recommend maxing out your elemental level (level 60) before doing these methods
(although this is just a recommendation and some still can be done without maxing).
Notorious Monsters (NM) are essentially FATEs that spawn in Eureka zones. Its important to note that these generally have a 120 minute
cooldown per instance they are killed in, meaning they cannot spawn again until then (with the exception of Bunnies which will be touched upon later).
NMs have a random chance of spawning when killing enemies of a specific type, some also require the weather to match a certain condition.
Ask around in Eureka zones for a link to the tracker to see what's available and what's coming up, and join "prep groups" to see if you can
help spawn the NM.
## Eureka Magicite Material
Image of Eureka Pyros
*The following method requires you to have reached Eureka Pyros or Eureka Hydatos*
Eureka features a unique mechanic known as the "Magia Board". This is where you slot in "Magicite" to give yourself certain elemental
buffs while in Eureka zones.
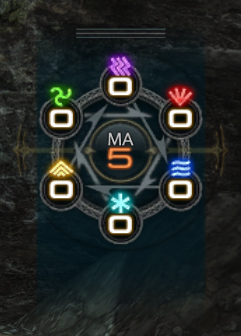
Magia Board. Numeber of magicites shown in the middle
To get the last 2 magicites for the board, you'll need to get rare materials from the last 2 Eureka zones, Pyros and Hydatos.
**These have a chance of dropping when completing the NMs/FATEs listed below with full credit (Gold rating)**
*For the 6th magicite the following materials are needed:*
| Material | FATE Name | Spawn Condition |
|----------|---------|----------|
| Lamebrix's Dice | Thirty Whacks | Killing Illuminati Escapees |
| Ying-Yang's Tissue | Haunter of the Dark | Killing Pyros Hecteyes |
| Skoll's Claw | Heaven's Warg | Blizzard Weather and Killing Pyros Shuck |
> TIP 1: On some datacenters, Skoll and Ying-Yang are typically spawned and killed in succession
>
> TIP 2: Since skoll requires the weather to be Blizzards, this means that you will generally know in advanced when Skoll is spawnable using a weather tracker
> given that its not on cool down. It will usually spawn as soon as the weather turns over, as players have already "prepped" it in advance
>
> Because its predictable when Skoll will spawn, it will usually be instapulled so arrive early!
*For the 7th magicite the following materials are needed*
| Material | FATE Name | Spawn Condition |
|----------|---------|----------|
| Molech's Horn | Bullheaded Berserker | Killing Val Nullchu |
| Goldemar's Horn | Duty-free | Killing Hydatos Wraith (Night) |
| Ceto's Claw | Stone-cold Killer | Hydatos Delphyne |
Unlike the 6th magicite, these are pretty much ready to go whenever so long as they aren't on cool down. Players will spawn, prep, and kill these as soon as they're available.
**Keep in mind that the drop rates on these are low! These are rare materials**
These materials are always worth a pretty penny on the marketboard for the Eureka addicts who want Eureka best in slot.
- **Overall:** While Skoll and Ying-Yang can be planned for, the other NMs are generally killed as soon as they spawn so you'll sort of have to just pop
in and out to see if they're up (or better yet if the window is open help spawn)
- Generally a pretty quick RNG method since kills are fast and you can potentially get a MAX WIN (drop)
## Eureka Pagos: Cassie and Crab
*The follwing method requires you to be Elemental Level 35*
Eureka Pagos offers 2 NMs that drop rare gear that can be sold on the marketboard. These items provide players in Eureka with additional stat bonuses, but
don't serve much purpose otherwise.
Copycat Cassie is spawned by killing "Ametrats", but can only spawn when the weather is "Blizzards".
- It usually doesn't spawn immedeately after the weather changes to Blizzards, so you'll probably have to help spawn it. Thankfully the mobs are right next to the arena.
- The earrings only drop with full credit completion (Gold rating) so join a party!
- Cassie will be instantly pulled so make sure you're in the area when it spawns
King Artho is spawned by killing "Val Snipper", but can only spawn when the weather is "Fog"
- Usually will spawn as soon as the weather changes to Fog, so make sure to arrive early.
- The earrings only drop with full credit completion (Gold rating) and it dies extremely quickly so join a party beforehand
- This item is **UNIQUE**, if you already have one then make sure you place it in your Saddlebag before entering Eureka: Pagos
otherwise you'll miss out on the ring if you happen to get it

[Don't be like this guy on Reddit](https://www.reddit.com/r/ffxiv/comments/xu3s76/psa_dont_use_blitzring_while_farming_pagos/)
- **Overall:** A very predictable way of having a chance to make big gil. Set an alarm for when the weather changes to match the
conditions and hop into Eureka.
# Eureka Bunnies
*Minimum Elemental Level 20 required. But its best to be Elemental Level 35+*
Eureka Bunnies are a special type of NM that don't require any weather condition or prep to spawn. They also only have around a 8-15 minute cooldown
meaning that they are highly repeatable.
Completing a Bunny NM will give you the `Down the Rabbit Hole` buff for 15 minutes and also gives you a `Happy Bunny` which
follows you around.
The goal is to follow the Happy Bunny to a hidden chest that has spawned somewhere in the zone (this is initially invisible to the player).
To help you find the chest, you will get a `Lucky Carrot` as a key item (easily accessible from the side panel). Use this item and the Happy Bunny
will give you a hint as to the general direction of where the chest is.

You have to be within close proximity of the chest, and then use the `Lucky Carrot` to be able to see the chest.
**Each chest will award some amount of raw gil, some 4.0 era materia (V and VI), some logograms, and possibly a "rare" item.**
We're primarily after the logograms and rare items here, the gil is a nice bonus on top of all that.
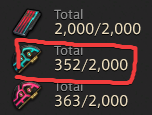
When you find a chest, it has the chance to be 1 of 3 types:
- Bronze Chest: 10 000 Gil
- Silver Chest: 25 000 Gil
- Gold Chest: 100 000 Gil
As you can probably guess, the rarity of the chest goes Bronze, Silver, Gold. There are some speculations on what the exact rates are but I'll say that
Gold chests are noticeably rarer than Bronze or Silver.
I'll go into a detail about each zone and what you're mainly looking for, its recommend that you are max elemental level in the respective
zone before attempting to farm these:
## Pagos Bunnies
- There's a Northern and Southern Bunny FATE in Pagos. Don't bother doing Northern Bunnies since the locations the Bunny brings you to are extremely dangerous
even at max elemental level and hard to get to (i.e Louhi's Cave). It's better to wait for the Southern Bunny to re-spawn
| Coffer | Notable Items |
|----------|----------|
| Bronze | Nothing, but at least you still get 10K gil |
| Silver | Nothing, but at least you still get 25K gil |
| Gold | Copycat Bulb Minion, Hakutaku Eyes |
There's 5 types of eyes, 4 of which you get from doing Bunnies. The prices vary but usually the Burning Hakutaku Eye are worth the most.
| | |
|----------|----------|
| | |
## Pyros Bunnies
- Same as Pagos, there's a Northern and Southern Bunny FATE in Pyros. Always go for the Southern Bunny and wait for it to re-spawn
- This is also where Logograms start to drop, people running Baldesion Aresenal will be looking to buy these
| Coffer | Notable Items |
|----------|----------|
| Bronze | Nothing, but at least you still get 10K gil |
| Silver | Archaeodemon Horns, Modern Aesthetics - Form and Function |
| Gold | Eldthurs Horn , Modern Aesthetics - Form and Function, Offensive Logogram, Protective Logogram |
| | |
|----------|----------|
|||
## Hydatos Bunnies
- There's only 1 Bunny FATE in Hydatos, so you'll have to wait for it to re-spawn
- Even at max elemental level, the enemies in this Bunny FATE are pretty tough so be careful
- Bronze coffers are actually good since they can drop Protective Logograms
| Coffer | Notable Items |
|----------|----------|
| Bronze | Protective Logogram |
| Silver | Mitigative Logogram (Guaranteed) |
| Gold | Offensive Logogram (Guaranteed), Eurekan Petrel Horn |
| | |
|----------|----------|
|||
- **Overall:** Excellent method. You make some amount of consistent gil and have a chance at some very valuable items. Its also always available to do and highly repeatable!
# Time Sensitive/Seasonal Things
These are a few things that are worth doing but are only available during certain periods of times. It doesn't necessarily mean they
can only be done during those times, but the gil you can make will be higher.
## Secondary Tomestone Materials
- At the beginning of a new Raid tier
Trade your "secondary tomestones" in for materials. The names of these vary from patch to patch, but I'm referring to the tomestones that doesn't
have a weekly cap and isn't Poetics.
As of writing this, the current "secondary tomestone" is `Tomestone of Aesthetics`
You'll have to find where the NPC that exchanges these is located, right now in Dawntrail the NPC is in Solution Nine.

During the beginning of a new savage raid tier, people will be looking to purchase these materials to make the best
craftable gear. This would be a good time to farm these materials and sell them on the marketboard.
However, the prices of these materials will drop as time goes on so its not always worth it to farm these.
I'd say they usually go for around 2000 gil each but of course this wildly varies depending on the time of the patch.
- **Overall:** Good gil but only during certain periods when craftable raid gear is needed. Still good to dump these tomes
using this method if you don't need it for anything else.